It’s a moment that can make you question everything. Is it ready? Should I look at it one more time? Anyone who’s ever printed a big job has felt that hesitation just before they send their print ready PDF along to the printer. When the result is hundreds or thousands of printed pieces that cannot be edited, the stakes are high.
Related: Addressing Current Commercial Print Problems.
Best Practices for Print Ready Files
We can make that moment easier for you. With a comprehensive checklist for high resolution print ready PDFs, you can ensure that you’ve prepared your PDF for a perfect print job—and a printer that’s happy too!
Your Complete Checklist
Even if you’re not a print expert, following these best practices will save you time and money and ensure that your print piece is on time, perfectly printed, and accurate. Once you work through this list, hitting send will be a cinch.
1) Select the File Format
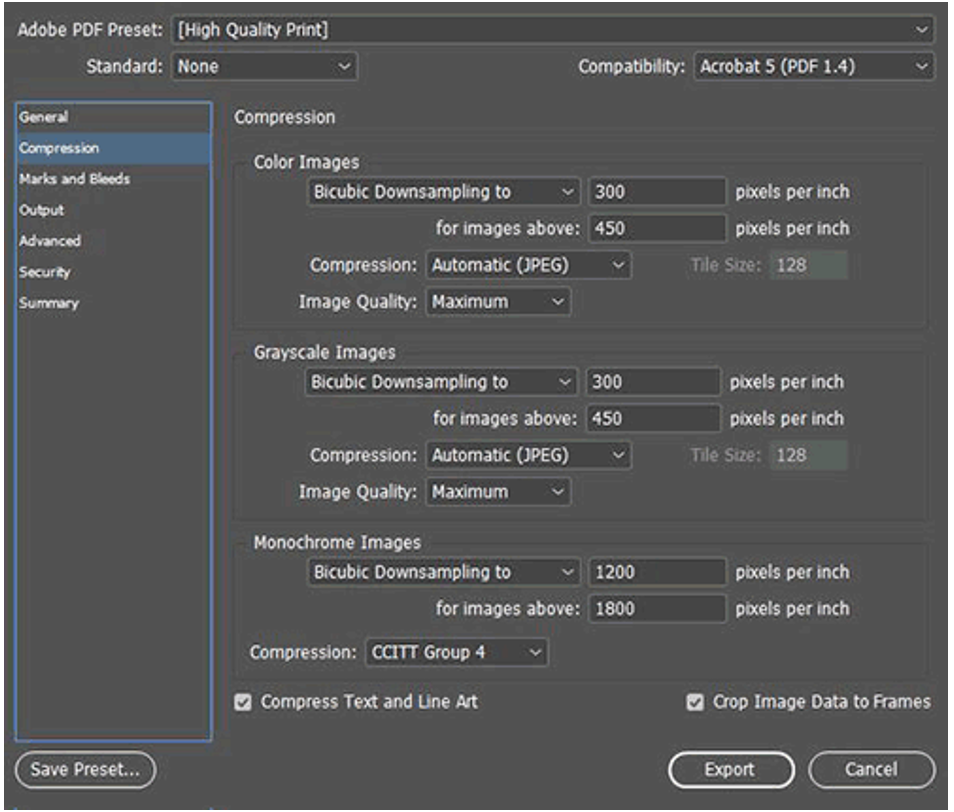
Quality beats speed when it comes to choosing the best file format for your print ready PDF. Rather than picking the fastest file format, you’ll want the file formats that have the highest quality images. Know that file formats all compress information differently. You’ll want to use TIFF or PNG since they have less compression and a higher quality. While JPG images are good for digital purposes, they generally aren’t as high quality for print (unless they’re at maximum quality) since they are recompressed with every save. If a JPG happens to have been saved at a lower quality, this quality decreases rapidly.
2) Go Vector!
A vector image is made up of lines and curves that have clean and sharp edges. When you’re printing text, line art, and logos, it’s important that you use vector files to ensure smooth, well-defined lines. These files maintain their high level of quality even when you change their size. Use AI, SVG, and EPS file formats.
3) Pick High Resolution
One of the most important steps you can take to prepare your PDF is to ensure that your images are crystal clear. You want high resolution, which is a function of how much data is in the digital image. For print, images should be at least 300 PPI (pixels per inch). . When the image is line art (bitmap), the resolution should be at least 600 PPI. It’s important to manage the resolution from the beginning, since making certain changes can make it impossible to restore high resolution later on.
For instance, while you might resize the file from time to time, and that often changes the resolution. Known as “resampling,” this actually affects the amount of data in the image. When you downsample by decreasing the size of an image, you remove data; increasing the size means upsampling, which adds data. Do not upsample! This will negatively impact the resolution. Rather, you can resample safely by following these steps:
When you change the size, check the Resample Image option (which is ticked by default) so that the data changes when you up or downsample. Unchecking the box means that the pixel size stays constant, so any size changes also change your PPI. As you make any changes, also make sure that you’re still at 300 PPI. When resampling, you can select other resampling methods to increase image sharpness. The default, bicubic automatic, usually is the best; but you can check to see.
Related: How to Get Files Ready for Professional Printing: Your Pre-Press Checklist
4) Get the Color Right
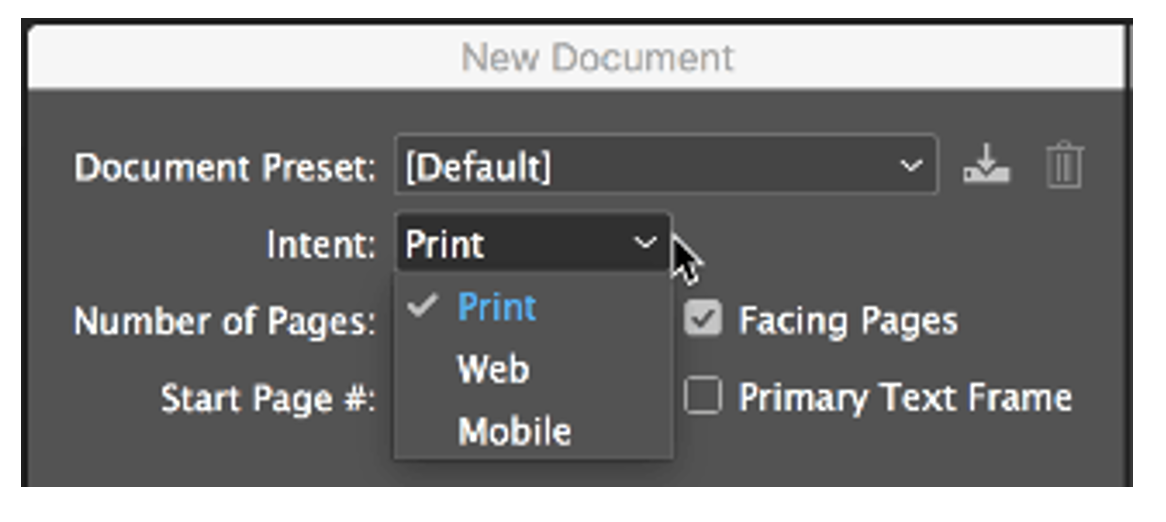
For those who aren’t working in the graphics world every day, color can be a daunting decision. It’s extremely common for printers to receive PDFs that don’t have the correct color formats. Many people design in the color space that’s called RGB (red, green, blue). These are the colors that compose light, and they are used for digital files, since screens use light to produce the images. Printers use a different format, CMYK (cyan (blue), magenta (red), yellow, black), which are the primary color pigments for print. Known as a four-color process or full-color printing, these colors combine to create every color that you need. Before you send your PDF to the printer, double-check that your colors are in CMYK by doing the following:
Go to New Document, and pull down the Intent menu to select “Print.”
5) Set Fold Lines
If you’re printing packaging, cards, brochures, or other pieces that will be folded, your PDF will reflect that with specific fold marks. This requires some preplanning, as you’ll need to envision how the piece will work, and where the folds will go. With the guides and ruler in InDesign, you can mark lines for the folds. Don’t forget to take the thickness of the paper into account, as this can affect exactly where the folds are.
6) Set Margins and Bleeds
Margins and bleeds are more important than you might realize. When you’re preparing a poster, card, brochure, or other printed piece, you’ll need to clearly define the margins, and if there’s a bleed, be sure to set it.
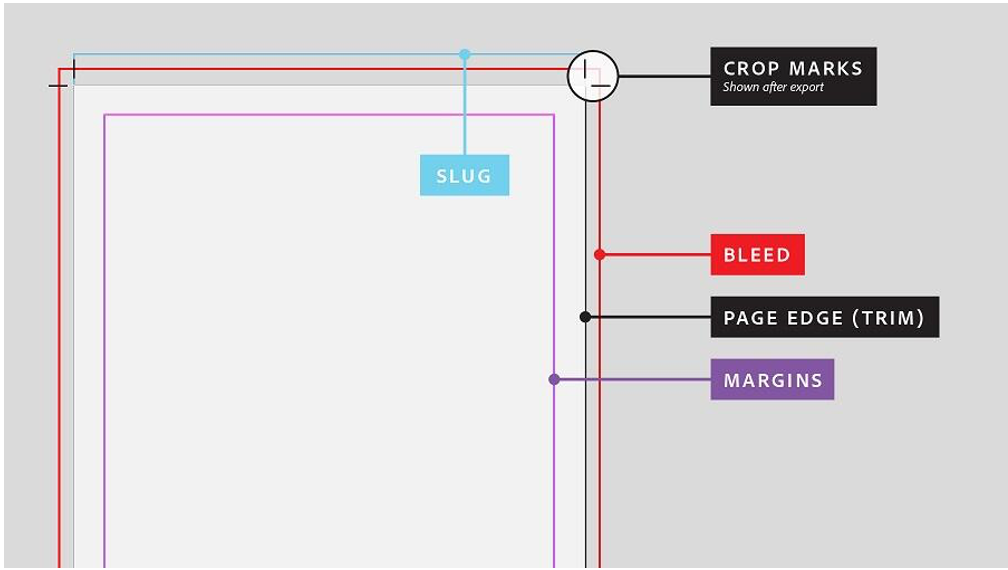
A margin, or “safe zone” defines the border between the printed area and the page edge. At minimum, you’ll need it to be 1/16” or 0.0625.” A good standard is a little larger, at 0.125.” This ensures that your printed image doesn’t get cut off. In InDesign, go to Layout > Margins and Columns to set your margins.
If the printed area has bleed, that means that the image will extend to the exact edge of the printed page. Since printers are not equipped to do this easily (or well), a bleed accomplishes this with a simple trick. You simply set the margins outside of the size you’d like to print and mark these as the bleed. The press prints ink out to this area, and then the page is cut down to the desired size. This eliminates any small white borders around the edge. To set up a bleed in InDesign, go to File > Document Setup and update the bleed in this dialogue box.
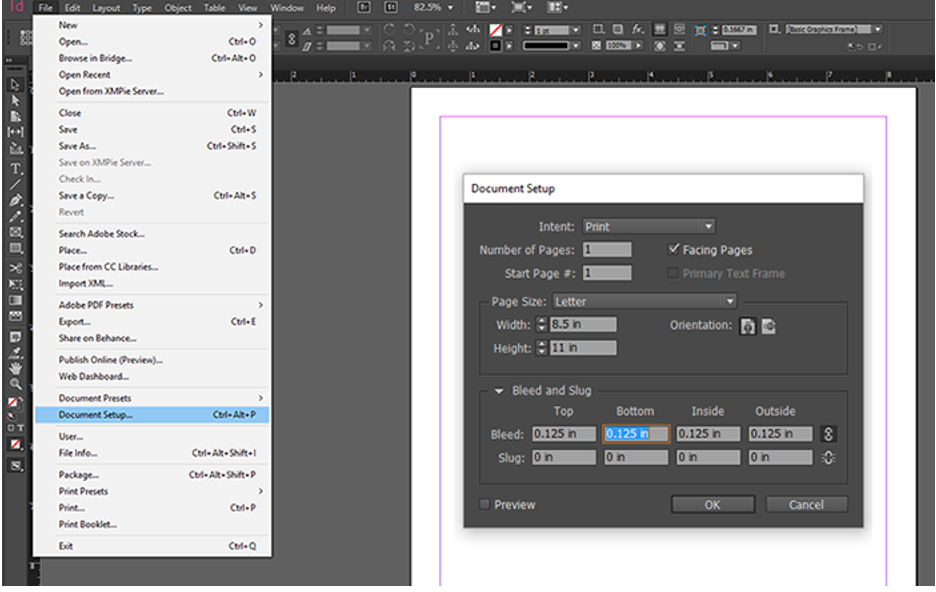
A typical bleed is 1/8” (0.125”) on all sides, or 0.25” larger than the trim size (where the cut is made). If your project does not have a bleed, the commonly used measurement is a 0.5” – 1” margin between the edge and your design.
For more information on bleed and crop marks, read on.
8) Watch the Naming Convention
Now that your file is ready, you need to name it. There are so. many. files. To keep them all organized, it’s important to formulate a logical naming convention. While you may use all or a few of the ones listed here, this lays out some of the common elements in naming conventions:
- Client name, initials or last name (Acme)
- Client’s brand (AcmeJeans)
- Client’s campaign (JulySale)
- Channel (Flyer)
- Element needed for channel (Image)
- Date (2022_08_25)
- Version number (v01)
So a file might be named something like: “Acme_AcmeJeans_JulySale_Flyer_Image_2022_08_25_v03” or a variation of this.
Related: You’ve Got a Print Ready File. Now What?
Send It
All set! Use this guide the next time you’re ready to send your print ready file to the printer. By working your way through it, you’ll ensure that everything goes smoothly. Not only will you save the time and money associated with snags and mistakes, but you’ll save the headaches of worrying whether or not the project will print correctly. If you’re ever unsure if your print project is ready, give us a call. We can help you get a file that’s press ready—and a finished product that’s press perfect. If your file is print ready, make sure to download our guide on how to share files and send to print!