Always looking for new ways to save time and money? We are too. Here’s an important tip that can not only cut time and money, but also it can help you create print pieces that are stunning. It’s setting bleeds, and it requires a bit of cutting itself. When you understand why bleeds are so important and how to set them, you’re set up for some very smooth printing.
Bookmark this page for future print jobs so you can have it at the ready!
- What Is Bleed?
- Why Do I Need to Include a Bleed?
- How Do I Include a Bleed?
- How to Add Bleed in InDesign
- How to Add Bleed in Adobe Illustrator
- How to Add Bleed in Adobe Acrobat and Acrobat Pro
- How to Add Bleed in Adobe Photoshop
- Some Parting Thoughts
What Is Bleed?
You’re probably already familiar with the term “bleed,” but since the printing world has grown to encompass the digital world too, this print-specific term is not as universally known as it once was.
Bleed refers to printing beyond the edge of your desired-size page. It means that you’ll extend your design beyond the true paper size, so that you can cut off the extra margins and have the design print to the edge. Due to the limitations of most printers, printing to the very edge of the paper is simply not possible; you’ll end up with blobs of extra ink. In fact, if you try this at home, a design that covers the entire page on your screen will often print out with a small marginal band of paper showing through. This is not professional or desirable, and that’s where a bleed “border” comes in.
Another reason we use bleed is due to the fact that the paper and the substrate printed on the paper are sensitive to the environment. Humidity in the air can cause shrinkage or expansion, so if you’ve set an image to print just beyond the desired paper size, it’s possible that you’ll still end up with that dreaded white band. To solve this, you’ll want to ensure that the bleed extends well beyond that desired end size, also known as the trim (since you’ll “trim” the bleed section off after printing).
Related: You’ve Got a Print Ready File? Now What?
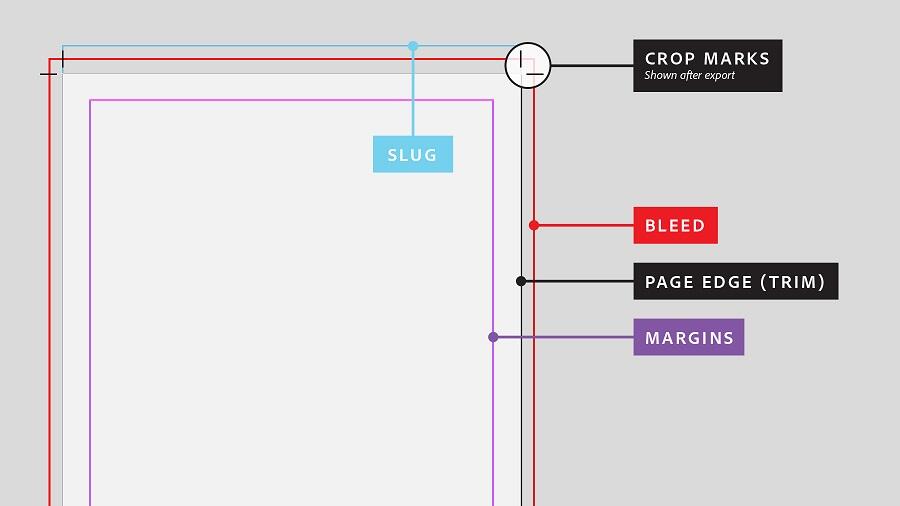
Here’s what your print-ready document will look like, with bleed and trim marks. The slug section will also be trimmed. It’s a good place to put any notes.
Why Do I Need to Include a Bleed?
You will want to include a bleed in every design you send to your printer. Bleed marks will let the printer know what settings the press and cutter needs for your design. This will also create an impactful and compelling piece. Large format pieces really pop with bleed. While adding bleed costs slightly more due to the additional ink, paper, and labor required, a full bleed piece is worth it.
Related: Bleed & Crop Marks? This Is What They Mean in Print
How Do I Include a Bleed?
Ensuring that you’re printing with a bleed is easy. Most design programs have a setting where you can determine the bleed amount (industry standards keep it at .125” or 1/8th of an inch).
Here is how you can set up the bleed in these Adobe platforms
How to Add Bleed in InDesign
It’s very straightforward.
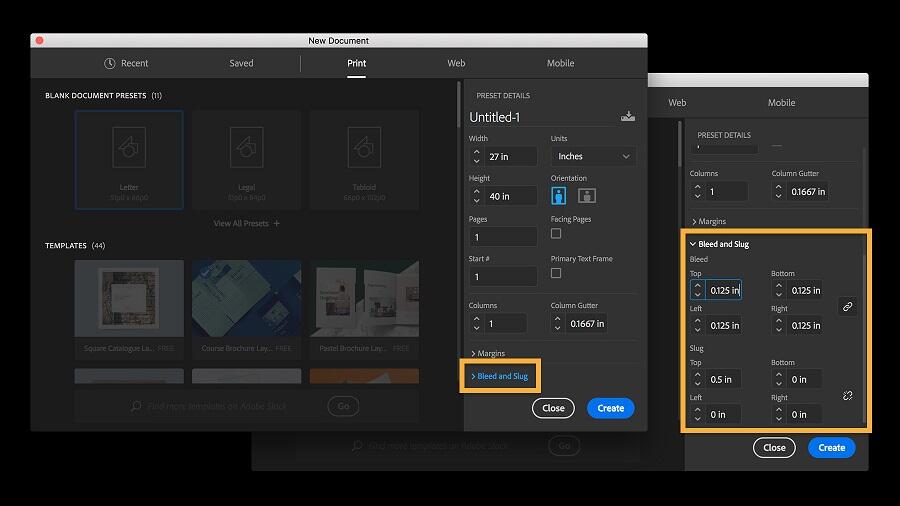
- When you’re ready to start a design, go to “Create New.” If the document was already created, you can reach this same dialog box by heading to “File>Document Setup.”
- At the top, select “Print.” Under the “Preset Details, pick your measurement units.
- Scroll down to the “Bleed and Slug” field. When you expand it by clicking on it, you’ll see bleed dimensions for “top,” “bottom,” “inside,” and “outside.” You’ll also see slug dimensions for the same. Keep the bleed values consistent, or if you want to make them different, use the chain icon.
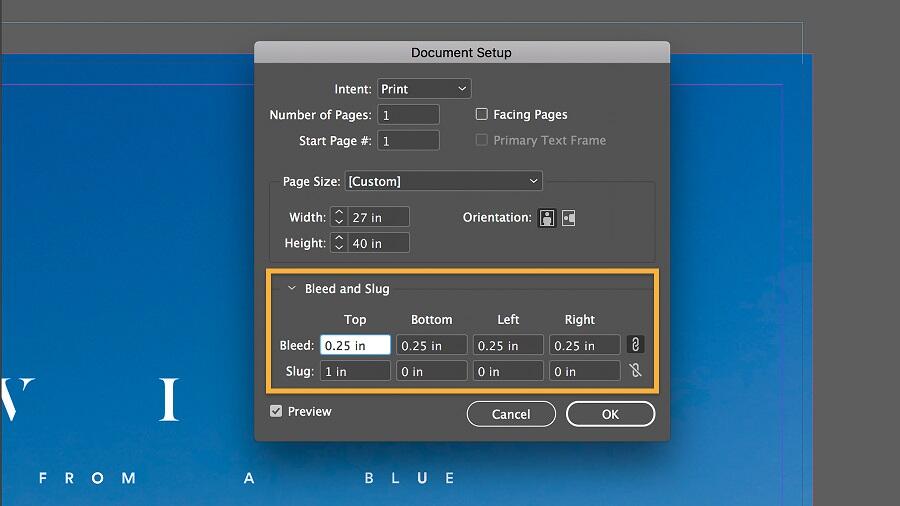
- A red line will show you the border of the trim, so note that anything beyond that will be cut. You’ll want to expand your design to reach beyond this border so you have a bleed. Make sure that you don’t cut off any important components as you extend the image to meet the bleed lines.
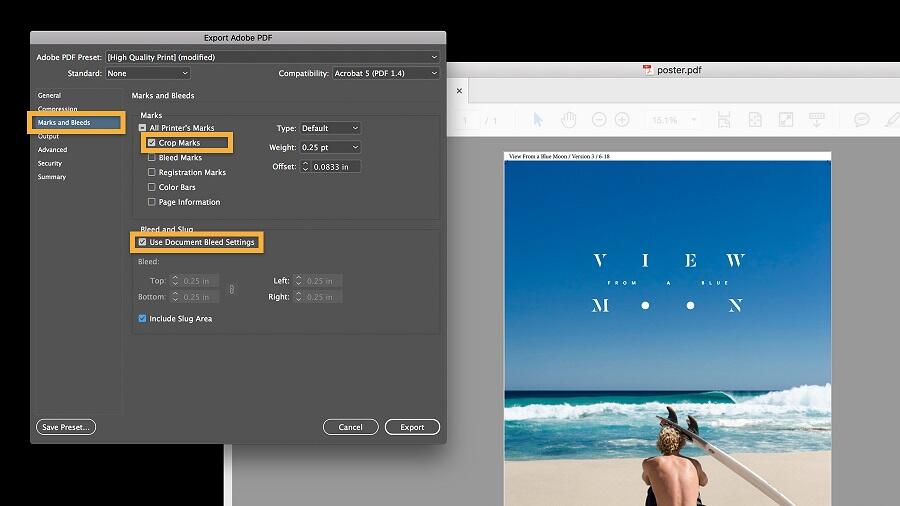
- The final step is adding actual bleed and trim marks that the printer can use. You’ll either head to the “Export” dialog box when exporting as an Adobe PDF, or the “Print” dialog box, where you’ll see “Marks and Bleeds.” This gives you options to add many types of marks (crop, bleed, and more), set the bleed dimensions, and include a slug.
Courtesy of Adobe
How to Add Bleed in Adobe Illustrator
This is also simple:
- Go to “File>Print.”
- Pick “Marks & Bleeds” on the left side of the dialog box.
- Enter the bleed values (you can click the link icon to make them uniform) or select “Use Document Bleed” to use the bleed settings defined in the “New Document” dialog.
- Go back to “Marks & Bleeds.” Select which printer’s marks you want to include.
Courtesy of Adobe
How to Add Bleed in Adobe Acrobat and Acrobat Pro
Now you’ve got the gist!
- Go to “Tools>Print Production>Add Printer Marks.”
- Pick the pages you want to mark.
- Pick the marks and settings.
Courtesy of Adobe
How to Add Bleed in Adobe Photoshop
At this time, there’s no capability for bleeds in this program. You can import your artwork into InDesign or send it our way and we’ll help you out. You can also “hack” a bleed by expanding the background by ¼” for bleed.
Some Parting Thoughts
While selecting marks can be very helpful for some printers, make sure to check with your printer to see exactly what they need before you provide these; many just require the bleed marks with no crop marks for the trim. And if you’re printing at home, remember that most desktop printers won’t be able to print all the way to the edge. You can solve for this by creating artwork in a document size that’s smaller than your paper size. Use the crop marks, and trim it when printed.
Tips like these go a long way towards creating a beautifully finished piece—and ultimately save you and your printer the hassle of incorrectly printed artwork, which can be a huge drain on time and money.
We recommend incorporating bleed wherever possible for the “wow” effect as well. Add bleed to your toolbox and you’ll be printing like a pro. While setting up your piece takes just a few moments, the results are jaw-dropping. And if you need help getting started, let us know! We use the entire Adobe Creative Cloud platform as well as other non-Adobe platforms like Canva and Microsoft Publisher. We’ll save you time, we’ll save you money, and we’ll make you glad you went with a bleed.
